It’s absolutely, totally, completely, sweat-running-down-your-back-ily summer. And that means it’s time for iced coffee.

(I did not take that awesome photo; it was taken by Thingo and shared on Flickr under a Creative Commons license. I’m grateful for this, because this post has been in the works for weeks, and held up by photo trouble!)
For years, I only bought iced coffee because I couldn’t figure out how to get the same results at home. But now the secrets have been revealed!
Secret #1: Make your coffee ahead! I usually am lazy and end up just brewing hot coffee in my drip maker and then putting it in the fridge, but you can also make cold-brew by mixing a third of a cup of ground coffee with 1 1/2 cups water and letting it sit overnight in the fridge, then straining the grounds out with a double-layer of cheesecloth. Cold brew has the advantage of being very smooth and low acidity; I just can’t usually manage cheesecloth before having any coffee.
Secret #2: Simple syrup. This was actually the first secret I learned, from a brilliant coffee shop that offered it in the summer. I make mine with two parts sugar to one part water. Combine them in a pan and heat over medium heat, stirring frequently. The sugar will dissolve into a cloudy solution; it’s done when the solution turns clear. I store mine in a mason jar, but a brilliant friend recently turned me on to using a rinsed-out wine bottle to store it for easier pouring.
Secret #3: Coffee ice cubes. This is the best part, because it saves you from watery coffee or trying some alchemy involving brewing double-strength and adding just the right amount of ice. Just freeze some brewed coffee in an ice cube tray. I find it easiest to pop the cubes out and store them in a tupperware once they’re frozen; that way I can wash and use the tray for other things in the meantime. If you add milk or sugar to your coffee, remember that these cubes will add about a tablespoon each of undiluted coffee to your mug as they melt!
I keep waffling over whether to post this recipe because it’s really too simple even to warrant being called a recipe in the first place. But as I was eating it for dinner for the third time this month, I decided it was just too tasty to pass up.

Here’s the secret: you don’t have to boil gnocchi. All the credit for this brilliant insight should go to Heidi, in whose footsteps I am merely following. She suggests using clarified butter, but I can attest that you don’t even have to go that far: just throw some butter into a frying pan and add the gnocchi. Cook them basically like homefries: roll them around in the butter first, then let them sit on one side until they get golden and crispy. After this, stir occasionally until they are as crisp-ified as you prefer. That’s it!
Although I’ve been known to reheat these in the microwave (they still taste buttery!), the texture is best fresh out of the pan. They’re great with stir-fried mushrooms or asparagus, but my favorite way to eat them is with my fingers, dipped in pesto.
In browsing back through all the blogs I didn’t read while I was away, I stumbled upon two things so useful that I couldn’t resist sharing them with you!
From Julie at Domestic Goddess Adventures, a template for cutting your own cupcake wrappers out of whatever awesome paper you like. (Note that these not liners: you slip them over the liner after baking, thereby increasing your stylishness by a factor of thirteen gazillion. No, I’d never heard of them before either, but now I want some!)
And second, from the lovely folks at Skip to My Lou, a super-easy way to print your own gorgeous recipe cards. I keep my recipes in a binder and an excel file, but for sharing or attaching to a gift, these can’t be beat.
Happy weekend!
If I were Michael Pollan and I were making up a motto for eating seasonally in New England in June, it would go something like this: Eat leaves. Mostly lettuce. All you can of it.
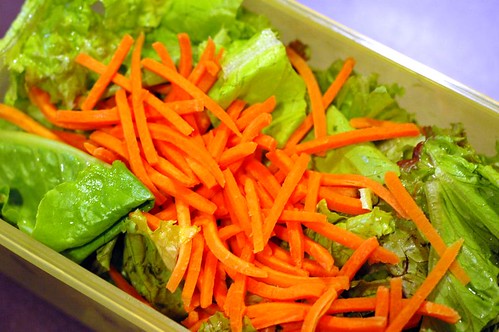
Summer and fall are the seasons of lettuce, as my first farmshare box attested: one bunch of broccoli rabe and one of radishes, two bunches of herbs, and three heads of lettuce, with a bag of mesclun on the side. Because I know this is coming, I try to hold out in March, when the first signs of spring arrive and I start thinking lustfully about salad. I do my best to save up all of my salad cravings for June, so that when it comes, I can happily eat giant bowls of salad for lunch and dinner. And yet, even I can get bored by this regime. So here are some suggestions for salads to mix things up a bit.
1. Greens Since the point of your salad is to eat these, use plenty. You’ll thank yourself at lunchtime if you tear them into really bite-size pieces before washing carefully and spinning or patting them dry. To mix it up, combine greens: you can add spinach, baby kale or chard, and leafy herbs like parsley, cilantro, or even dill to the bowl.
2. Raw vegetables The usual suspects of my childhood were carrots, cucumbers, and red peppers, plus maybe tomatoes. It turns out that there are many other options. You can use summer squash in ribbons, straight up or marinated first. Celery is best, in my opinion, if chopped up small; you can also add shredded raw celery root, cabbage, or kohlrabi. Avocado chopped into pieces is a nice addition, too. My current favorite is another spring crop: edible-pod peas.
3. Cooked vegetables This was the first revolution of my salad-eating life. Did you know you can put cooked vegetables in a salad and the salad police don’t come to get you? True story! Roasted beets were my first love in this arena, followed by grilled or broiled summer squash, mushrooms, and red peppers.
4. Beans It took me a long time to come around to this idea, but eventually I accepted that putting a bean salad on a bed of greens is actually a pretty great idea. My current favorite is white beans with goat cheese and walnuts.
5. Other stuff This category has several parts. Some people love crunchy stuff on salads – croutons, wonton noodles, or nuts, say. Bacon bits go here, or meat, or tofu. Some people like to add fresh or dried fruit. But my present obsession is with cheese. I’m into feta right now, but also love goat cheese, and have recently warmed to shaved Manchego as a salad topping.
6. Dressing Hi, my name is Sarah and I am a bottled-dressing-aholic. I am trying to overcome my addiction, though, and a proliferation of recipes for everything from vinaigrette to blue cheese dressings is helping me. Swapping dressings out can make the same salad seem different every day. If you’re bringing a salad with you, though, be sure to carry the dressing separately; greens go limp when coated for more than a few minutes.
Sorry for the long absence, everyone! I’ve been doing too much traveling and not enough cooking. My farmshare is now in full swing, though, so you can expect a regular round of recipes and the answer to all of your kale problems soon! In the meantime, if you have a farmshare vegetable or other ingredient you’re puzzling over, tell me about it in comments, and I’ll see what I can come up with.
People. I owe you some awesome recipes! But I’m about to go work at a week-long event, and thus I am lucky to be eating anything that doesn’t come out of a bag.
We will be back to our regularly scheduled posting in June, but in the meantime, I bet I’m not the only one with this problem, so here’s what I eat when I can’t get it together to make anything blog-worthy.
1. Pasta plus green vegetable
I use broccoli most often, but have used asparagus and snow peas a lot too. You prepare the vegetable in little pieces (chop asparagus, halve peas, floret broccoli) and boil a pot of water. Add your pasta, and a minute or two before it’s done, throw in the vegetable and let it cook along with the pasta. Drain the whole thing and eat with pesto or stir in goat cheese thinned with a little olive oil. (I’ll post a real recipe for a fancier version of this last one as soon as I get a reasonable picture!)
2. Lentils
You can cook lentils in 20-30 minutes, and then keep them in the fridge. I eat them most often with goat cheese or feta crumbled on top; they’re also awesome with sliced or shredded carrots mixed in and vinaigrette. If you’re really pressed for time, you can buy cans or vacuum packs of pre-cooked lentils, a bottle of salad dressing, and a bag of pre-shredded carrots. I won’t tell anyone.
3. Black beans
Put a can of them in a skillet with half a jar of salsa and cook them over medium until the liquid that seeps off the salsa is gone. Eat it with tortilla chips or over couscous. Throw avocado on top if you have it. This is somehow three times as awesome as the sum of its parts.
When I get back, I’m going to be reunited with my chest freezer (which has been on a little sabbatical at my parents’ house while room was made for it at my current house), so there will be some posts on the best way to solve the too-busy-to-cook problem: stashing frozen pre-cooked meals!
While I’m gone, tell me about what would be helpful: what kinds of recipes are you looking for? What cooking task intimidates you? What keeps you from cooking as much as you’d like? I’ll see if I can think of helpful things!
I’m on a bit of a pasta kick lately. This is partly because I now live in a house with a kid, and pasta is almost sure to be well reviewed, and partly because April and May are the among the craziest times of the year for me and pasta is easy. Moral of the story: nothing wrong with easy.
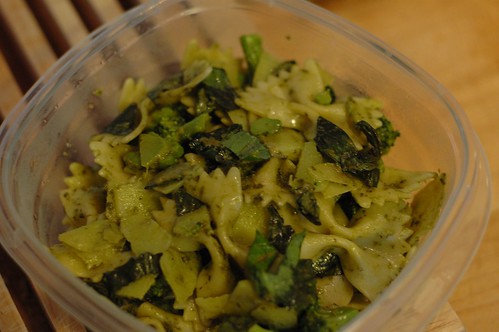
This is one of those brilliant dishes where you cook everything in one pot, which gets it extra easy points. I will even cop to using store-bought pesto for this, and while I admit this to be a travesty when compared with homemade, I submit that sometimes you just need something for lunch and this beats the heck out of fast food.
Pasta with Broccoli, Potato, and Pest
Adapted from Jamie Oliver’s Food Revolution via Serious Eats
1 potato
1 head of broccoli
Kosher or sea salt
1/2 lb. pasta (I used bowties; Jamie recommends tagliatelle, which is wide flat pasta)
1/4 c. pesto
1/4 c. parmesan (or a blend with parmesan, asiago, romano, etc.)
Fresh basil, if you feel like it or have it handy
Put a big pan of water on to boil and salt it generously. The standard instruction is that it should taste like the sea, so however much salt you’re using, it’s probably not quite enough!
Cut the broccoli into small florets. If you like, you can also peel and very thinly slice the stem. Peel the potato, then use your peeler to shave it into slices. If you’re using basil, pick the leaves off the stalk and use scissors to snip it into smallish pieces.
When the water boils, add the pasta and broccoli stalks and cook until two minutes before it will be done, according to the package instructions. Then add the florets and potato slices.
When it is finished, use a measuring cup to scoop out a half-cup or so of pasta water, then drain the whole thing. Put in a bowl and toss with the pesto (and basil, if you’re using it), using the pasta water as needed to thin the sauce to the consistency you prefer.
Serve topped with the cheese. Serves 3-4.
This is one of those perfect lunch foods: it has vegetables, it travels well, and it’s good warm, cold, or anything in between. I have visions of taking it on picnics and having it at summer brunches.
You could substitute other vegetables here: just check on how long they need to roast and cook them in a separate pan if it’s significantly different. But keep the original on hand so that in a few months, when summer squash are covering every surface of every table at the market, you’ll know what to do!
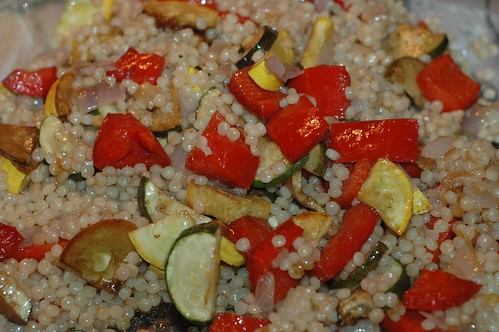
Israeli couscous salad with roasted vegetables
Adapted from Epicurious
3 T. olive oil
1 1/2 T. balsamic vinegar
1 clove of garlic, minced or pressed
salt and pepper
1 zucchini
1 summer squash
1 red pepper
1/2 onion
3/4 c. Israeli couscous (~4 oz.)
1 3/4 c. water
Preheat the oven to 450 F.
Mix two tablespoons of the oil with the balsamic vinegar, garlic, and salt and pepper in a small bowl.
Trim the summer squash and zucchini. Cut each in half and then slice into half-moons. Remove the seeds and stem from the pepper and cut to a 3/4-inch dice.
Arrange vegetables in a single layer on pans. I did this with two 9×13 pans, but a jelly-roll pan or rimmed cookie sheet would also work. Drizzle half to two-thirds of the dressing over the vegetables and put them in the oven. Roast for 12-18 minutes, turning at least once. They’re done when they’re tender all the way through and the squash are just starting to brown.
Meanwhile, chop the half an onion, and add it to a saucepan with the last of the oil over medium heat. Saute until softened, then add the couscous and stir to coat with oil. Continue to cook for a couple of minutes to lightly toast the couscous, then add the water. Turn the heat to high and bring to a boil, then cover, reduce the heat, and simmer until the couscous is tender, about 9 minutes.
Remove from the heat and drain off any extra liquid. Stir in the vegetables. If needed you can add more dressing, or additional salt and pepper. Serves 4-6, depending on how hungry you are!
There are muffins and then there are muffins. These guys, loaded with regular and white chocolate chips, and rich with butter and yogurt, are definitely in the latter category. In fact, for me, these are more of a brunch food than something one might reasonably eat for breakfast. People less than five feet tall (or anyone in possession of a serious sweet tooth) may have other opinions.
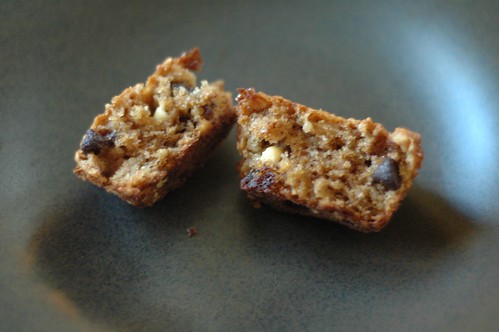
These muffins have been part of my repertoire for a million years, and their source is now lost to history. I think I found the recipe originally on the Godiva recipe list, but if it was ever there, it’s long gone now. The white chocolate is especially nice here because the muffin batter is not super-sweet, but in a pinch, making them with all regular chocolate chips will work too.

I recommend making these in paper liners. No matter what I do, the chips stick to the sides of whatever I bake the muffins in, and it seems a shame to wash perfectly good chocolate down the drain! If you have enough to freeze, it works fine, and you can defrost them on the countertop overnight.
Oatmeal chocolate chip muffins
1 stick (1/2 c.) butter
1/2 c. brown sugar
1/4 c. white sugar
1/2 c. plain yogurt
2 eggs
1 c. flour
2 t. baking powder
1 t. baking soda
1 t. cinnamon
pinch salt
1 c. oats
1/2 c. chocolate chips
1/2 c. white chocolate chips
Preheat the oven to 375 F.
Melt the butter in a large bowl in the microwave (or in a pan on the stove). Add the sugars and mix, then the yogurt, then the eggs.
Add the flour, baking soda, baking powder, cinnamon, and salt all at once and mix, then stir in the oats and chocolate chips.
Fill the muffin cups three-quarters full and bake for 18-20 minutes, until golden brown. Makes about 15.
We’re in a strange between-time in my part of the world: it’s warm enough that spring food is on my mind, but not warm enough for any that food to be actually growing yet. So my compromise position is grain- or legume-based salads, which seem lighter than my usual winter fare but rely more heavily on pantry staples than summer salads need to.
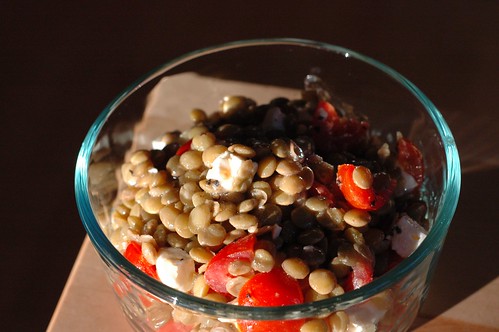
This is one of my absolute favorites in that genre, inspired by a fabulous dish I had at La Provence. It’s both simple and tasty and keeps, dressing and all, for several days in the fridge. Proportions are not crucial here: you can adjust the quantities of cheese or tomatoes depending on what you have.
Your local tomato options are probably pretty limited right now if you live in a cold part of the world; you can look for hothouse tomatoes from closer to home or try cherry tomatoes, which don’t suffer as much from being out of season.
Lentil salad
1 1/2 c. lentils*
1/4 c. olive oil
1 T. red wine or balsamic vinegar
1 t. Dijon mustard
Salt and pepper
1 pint cherry tomatoes or a heaping cup of chopped tomato
2 oz. feta cheese
Bring a medium saucepan full of water to boil. Add the lentils, cover, and lower to a simmer. Cook for 20-30 minutes, until tender, then drain in a colander.
Meanwhile, make the dressing by mixing the oil, vinegar, mustard, and salt and pepper. I usually do this in a Mason jar so I can shake it to mix, but you can also do it with a fork or whisk in a bowl.
Rinse and halve the cherry tomatoes. If you’re like me, you can also squeeze out the seeds, or you can leave them if you’re less picky. Put them in a large bowl. Dice the feta and add it.
Add the cooked lentils and mix, then dress to taste with the vinaigrette.
Makes about four servings.
*Don’t use red lentils here, which break down and lose their shape. Green and brown lentils (which are really more like “brown and browner”) both work fine, as do black and French green lentils, which are a bit firmer in texture and also harder to find.
Guess which food blogger completely failed to post this week? Oh, that would be me. And not for lack of food, either! I owe you all some salads next week, and by then, hopefully I will even have made extra-awesome versions.
In the meantime, here’s a peace offering: a roundup of adorable, sustainable, or otherwise awesome containers for carrying food that I’ve come across lately.
Box Appetit has two smaller containers that can sit inside the main one, plus its own fork. The inner containers are removable, and the whole thing is BPA-free. The only downside is that it’s not super-well-suited to standards like sandwiches.
I’ve had a box from Laptop Lunches for years. It’s great because the multiple containers encourage you to pack a varied meal, and I love the look of the new, adult-sized Bento 2.0 kit. These are also BPA-free and made in the States.
My eco-crunchiest lunch box might be the two-tier classic tiffin from To Go Ware, which is made of stainless steel. The big bottom container is so perfect for salads that I nearly always include one, and the top one is still big enough to hold noodles or protein + grain. Plus, the company now sells steel dressing containers too!
I’ve just come across the adorable stainless-steel containers by Lunchbots. LUNCHBOTS! Is there a better name in the whole world? Even without the steel top (which they have!), I was sold.
Goodbyn might win the prize for being most adorable. Also, it has stickers. And, on a more practical note, a built-in drink container. It can go in the dishwasher and is recycleable. It also has five different food compartments, for those of you who want your salad not to touch your banana.
|
|