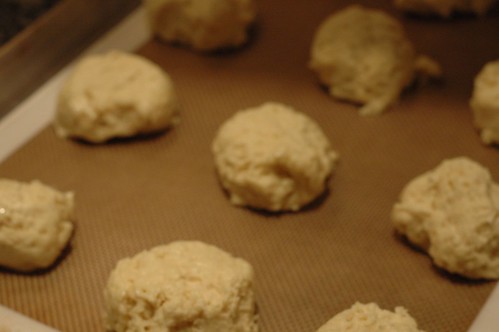
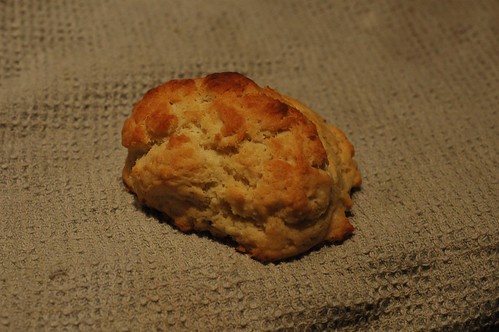
I love lots of biscuits, but these are particularly good: crisp on the outside, moist on the inside, and rich enough that even I sometimes go without slathering them with butter. (Not often, but it’s been done!)

(My poor tiny little lens. It loves the white backgrounds!)
I am as prone as anyone could be to starting a recipe with only a cursory look at the ingredients list to see if it seems plausible that it matches up with my pantry, but you’re going to want to read this one all the way through because of the exciting baking options at the end. I like the drop biscuits quite a lot; my sister (who always preferred the middle of the bread anyway) likes the less-crusty pull-apart option. Sadly for her, she missed the baking, and so all of the photos are of my kind. Let this be a lesson!
Although these are best hot from the oven, individual biscuits can be reheated in the toaster and a whole group can go in the oven for five or ten minutes, anywhere between 300 and 400 F. Normally, you cover baked goods with foil when you reheat them like this so they don’t dry out or brown, but leave these in the open — it’s a short time, and it’s essential that the crust remain crisp!
Buttermilk biscuits
Adapted from Cooks Illustrated
10 T. butter
2 c. flour (plus extra for pull-apart biscuits)
2 t. baking powder
1/2 t. baking soda
1 t. granulated sugar
1/2 t. kosher salt or finely ground sea salt
1 c. cold buttermilk
Preheat your oven. If you’re baking as drop biscuits, heat it to 475 F; if you’re baking in a pan, heat to 500 F.
Melt one stick (8 T.) of the butter in a small bowl or liquid measure.
Mix the flour, baking powder, baking soda, sugar, and salt in a bowl.
Add the cup of cold buttermilk to the melted butter and stir with a fork or whisk until clumps of cooled butter form in the mixture. (This is what produces that lovely texture in the finished biscuits.)
Add the buttermilk to the dry ingredients and stir just until combined.
Melt the remaining 2 T. of butter.
For drop biscuits: Grease or line a cookie sheet. Drop the batter on to the sheet in 12 equal portions. (Each portion should be about a quarter-cup of batter; if you’re going to measure, grease the cup first!) Brush the tops with the remaining butter and bake for 12-14 minutes, until golden brown.
For pull-apart biscuits: Grease an 8- or 9-inch round cake pan. Divide the batter into 12 portions and roll each in flour, then add to the pan. Put nine or ten in a ring around the outside edge and the rest in the center. They’ll be squishing in next to each other; don’t worry! Brush the tops with the remaining butter. Put in the oven for five minutes, then turn the oven down to 375. Bake until the biscuits are golden brown on top and sound hollow when gently tapped (a sign that they’re cooked through on the inside), 15-20 more minutes.
Did you know that when you start a food blog, some scary foodies come and take you away at night and force you to sign a food blogging contract? Among other things, it specifies that the blogger must regularly exhort her readers on the simplicity and even superiority of making at home the kinds of foods that normal people buy in packages in the store.
As you’ve probably guessed, the time has come for me to fulfill that obligation, but fortunately, I have found a recipe which actually is both simple to make at home and ridiculously tasty. Plus, if you are a righteous raisin-hater like me, you’ll never again have to pick raisins out of perfectly good granola.
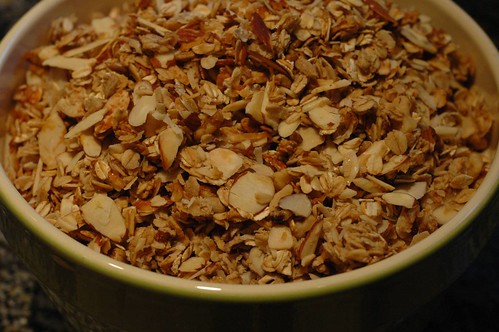
This recipe was given to me by a friend and is extremely flexible. You want to aim for a 1:1 ratio of oats-to-other-stuff, and to avoid salted nuts or seeds in the add-ins. My version is based off of using half of a large container of oats because that makes about as much granola as my biggest bowl can manage, but you could easily adjust it if you have a really mighty bowl. Just don’t make more than you can eat; this tastes best in the first month or so after you cook it.
I usually make this in 9×13-inch pans, where it turns out chewy because I pile it in an inch or two deep. If you prefer it crunchier, make sure to spread it into a single layer on baking sheets.
One final note: if you’re the kind of person who is into dried fruit in your granola, you’ll want to add it after the granola is fully cooked.
Granola
About 6 c. of old-fashioned rolled oats
6 c. of other granola goodies (see below for suggestions)
3/4 c. water
1/2 c. neutral oil (canola, grapeseed, corn)
3/4 c. honey, maple syrup, molasses, or a mix (I’d start with only a couple of tablespoons of molasses, which has a very strong flavor)
Put the water in a saucepan or kettle to boil. Preheat your oven to 250 F.
Mix the oats and other goodies with your hands. Add the boiling water, oil, and honey. I recommend that order, as the oil helps the honey slip out of the measuring cup. Clever, no?
Stir to coat the ingredients. The mixture will just be damp, not actually very wet. Spread in pans or on rimmed baking sheets and bake for 50-60 minutes. Stir every 20 minutes or so to help it cook evenly. The edges should just be browning when you remove it from the oven.
Be sure to take the granola off of the pans immediately, before the honey has a chance to turn into cement. (It’s also a good idea to wash the pans pretty soon.) I usually just turn it out into a bowl, but if you’re going for crunchy, you may want to turn it on to parchment paper or somewhere else you can spread it to cool.
When cool, store in airtight containers (I use canning jars) for up to a month.
Suggestions for goodies:
- sliced or slivered almonds
- chopped walnuts, cashews, or pecans
- shredded coconut (I use sweetened)
- chopped crystallized ginger
- shelled sunflower or pumpkin seeds
- flax or sesame seeds
- wheat germ (no more than a cup)
- a teaspoon of cinnamon
- a teaspoon of vanilla (mix it with the water for more even distribution)
I admit I’m not completely crazy about the gratin or the hash brown patty. With those two exceptions, I love pretty much every preparation of potatoes. Home fries, french fries, pommes Anna, latkes: I’ll take them all. Soon it will be the season of fingerlings and potato salads in my part of the world, but before we get there, I wanted to give you one last lovely use for full-size winter potatoes: smashing them!
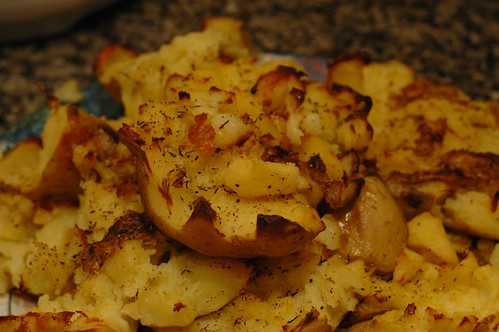
These were really popular a few years back in a variety of versions. Some recipes call for the potatoes to be almost mashed, while others — like this one — err on the side of structural integrity. The really brilliant part of this is the second baking, which browns and crisps some of the flesh of the potato.
Smashed Potatoes
Adapted from the Pioneer Woman
1 potato per serving (I love Yukon Golds)
Olive oil
Salt
Pepper
Optional: a pinch dried or 1/4 t. fresh chopped herbs per potato (I like rosemary and thyme both a lot)
Wash the potatoes, then put a pot of water on to boil. When it is boiling, drop the potatoes in and boil until they can easily be pierced through with a bamboo skewer or fork. This takes 35-45 minutes for regular-size potatoes.
Drain the potatoes in a colander, preheat your oven to 450 F, and generously grease a baking sheet with olive oil.
Put the potatoes on the sheet and smash them! I found it most effective to cut a silt a couple of inches long in the skin of the potato, and then to smash it with a potato masher a couple of times. If you don’t have a masher, you could do the first squish with a heavy-bottomed glass or a cast-iron pan, and then finish with a fork. Try to make sure most of the insides end up on top of the skin.
Brush the tops of the potatoes with more olive oil, then generously salt and pepper them and sprinkle on the herbs if using. Bake for about 25 minutes on the top rack, until the tops are golden brown
It must be getting towards spring, even here, because I’m ready to think about salads again. But not green salads: every year in June, my farmshare delivers up so much lettuce that eating green salad every day — sometimes twice a day — is the only way to manage it, so I try to save up my green salad desires for that. Instead, I’m going for bean salads and salads like this one that combine grains and vegetables.
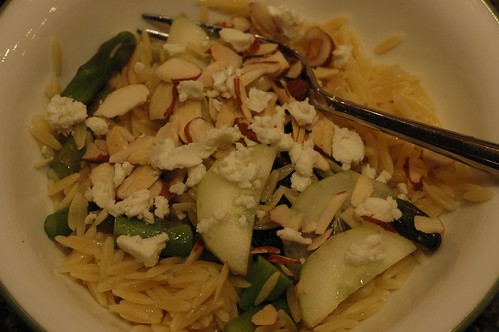
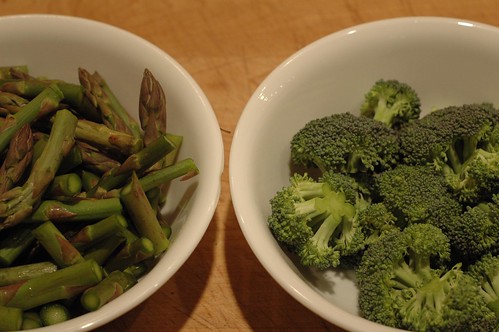
The grain in this salad is orzo, a tiny pasta shaped a bit like grains of rice. It’s combined here with broccoli, asparagus, and feta, and then optionally topped with almonds and cucumber. The full version (pictured above) is lovely, but I find myself making the simpler version much more often.
Orzo and feta salad
Adapted from 101 Cookbooks
1 pound dried orzo
Half a bunch of asparagus (about a dozen stems)
A small head of broccoli
1 clove of garlic, minced, or 1/2 t. crushed garlic
2 T. lemon juice
1/4 c. extra virgin olive oil (this is a time for a good one; you can taste it!)
pinch salt
1/3 c. feta
Optional: a handful of slivered or sliced almonds; a quarter of a cucumber.
First, set a large pot of water on the stove. Salt it, and turn the heat to high.
Snap off the woody ends of the asparagus, then chop the remaining spears in segments about two inches long. Remove the broccoli’s stem and chop into small florets, not more than an inch across.
When the water boils, add the orzo. It usually takes about ten minutes to cook, but double-check the package. One minute before it is done, add the broccoli. Wait 30 seconds, then add the asparagus. Wait another 30 seconds, then drain. The vegetables should be bright green and just tender.
In a little bowl, mix the garlic, salt, lemon juice, and olive oil. Put the orzo-vegetable mix in a bowl, and mix it with about half of the dressing. Chop or crumble the feta and sprinkle it on top.
If you are using the cucumber, peel it. Slice thinly, then half the slices to make half-moons.
I recommend storing the salad without the cucumber and almonds on it: the cucumber is moist enough that it can make the feta sticky, and the almonds soften. If you want to use these, add them just before serving, or in the morning if you’re packing a lunch. The remainder of the dressing should be added at the same time.
Makes about eight servings.
Adam over at Amateur Gourmet has launched an awesome new feature: a community blog. I have a guest post up over there, with a recipe for cinnamon oatmeal scones.
Check out the rest of the site while you’re there, or go here for the option to subscribe to an RSS feed of my posts.
I called this a cheesecake, but it’s not exactly true, because there’s no baking in this recipe. This turns out to be brilliant: it comes together quickly, can be made ahead, and is the kind of thing you can imagine making in the non-oven months, like July.
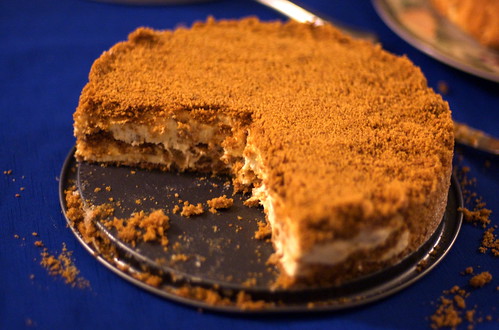
(Thanks to my friend Tim Pierce for this photo.)
I’ve made this cake as pictured, and also in paper-lined muffin tins for individual servings, and both worked well. The filling is ultra-creamy and not too sweet, and the tang of the marscapone does a nice job of setting off the heat from the ginger.
Ginger marscapone cheesecake
Adapted from Dozen Flours
1 box crunchy gingersnaps (12-16 oz)
4 T. unsalted butter
1 c. cream cheese (or one 8-oz. package)
1/2 c. plain yogurt
2/3 c. sugar plus extra for the pan (I liked this with turbinado sugar; white granulated sugar also works)
1/2 t. vanilla
1 c. crystallized ginger
2 c. marscapone cheese
1/3 c. heavy cream
Grease a springform pan, and then dust it with sugar the same way you’d normally dust with flour. Tap out any excess.
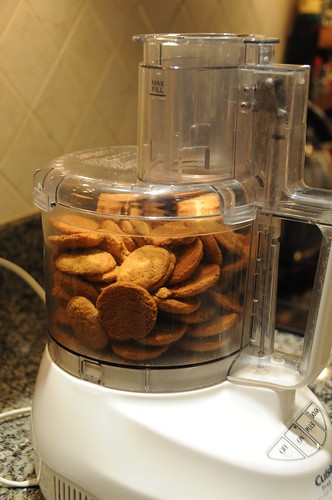
Crush the gingersnap cookies. It’s easiest to do this by whizzing them in a blender or food processor, but I’ve also done it by putting them in a bag, closing it carefully, and then smashing the heck out of them. Ideally, you’ll get uniform, fine crumbs, but it doesn’t matter too much.
Melt the butter in the microwave or on the stove top, and then add it to the gingersnaps. If you used a really big box, you might need a bit more butter to evenly mix with the crumbs without dry spots. Press a third of the mix into the bottom of the springform.
Put the cream cheese in a bowl. You’ll probably want to do this with a mixer — I’ve used both stand and hand mixers successfully — but you could also do it with strong biceps! If you choose the latter option, make sure your ingredients are softened before use.
Whip the cream cheese until smooth, and then add the yogurt, sugar, and vanilla. Add the marscapone and mix, then the cream.
Chop the crystallized ginger as finely as you reasonably can, and stir it in to the filling mixture.
Carefully spread half of the filling over the bottom crust. Be careful not to make holes in your crust when you do this; using your fingers or a silicone spatula is probably easiest. Sprinkle half of the remaining cookie mix over it, as evenly as you can, then top with the remaining filling and finally the last of the cookies.
Refrigerate this, covered with plastic wrap, for at least a few hours; overnight or even 24 hours is fine. After this, you should be able to remove the outside of the springform and carefully slice.
Serves about 16.
I love potatoes in pretty much any form. When I was a kid, my dad made “Susan fries,” which were pan-fried slices sprinkled with paprika. (Susan’s other big culinary contribution to my life: butterscotch chips in brownies. Seriously, try it.) Homefries made in a skillet were one of my first truly excellent dishes, and when I finally decided mashed potatoes weren’t against my religion, I fell hard and fast for them. But sometimes even I want something other than starch at breakfast or brunch, which is how we got to these Southwestern homefries.
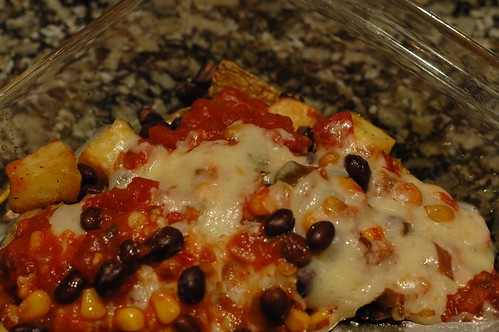
The addition of beans and cheese makes these a little more balanced and substantial. They were inspired by a dish I love at Sylvester’s in Northampton. Their version features onions and peppers, too; mine is simpler and requires you to chop only the potatoes.
Southwestern Homefries
4 medium-to-large potatoes (about 2 lbs)
Olive oil
Salt
2 c. cooked black beans (or one 15-oz. can)
2 c. salsa (one 16-oz jar)
About 2 c. grated cheddar cheese
Preheat the oven to 400 F.
Wash the potatoes and then dice them, aiming for about a one-inch dice. Spread them in a single layer on a rimmed baking sheet or in pans. Add olive oil and toss to coat; I usually use 2-3 T. Sprinkle with salt, then put in the oven.
Let them roast for 20 minutes without stirring, and then use a spatula to turn them. Add more olive oil if the tray is getting dry, and roast for 20 more minutes. Then check to see if they’re cooked all the way through by sticking a toothpick in one piece. If it goes through easily, they’re done. If not, continue roasting until they are. Depend on how small you cut them, they could take up to 20 more minutes.
(To make something that comes together quickly in the morning, you can do the above steps ahead of time and keep the roasted potatoes in the fridge. You’ll want to reheat them in a foil-covered pan at 350 until hot, about 10 minutes, before proceeding.)
Transfer the roasted potatoes to a square baking dish. Drain and rinse the beans, and then top the potatoes with them and the salsa, and finally the cheese. You can adjust the amounts of any of these to taste. Turn on your broiler and stick the pan in under it. Stay nearby and check frequently; it should take about five minutes for the cheese to get melted and bubbly.
Serves four.
I didn’t go into this salad with a good attitude. The first batch of beans I tried cooking for it had their own attitude problems, and they pretty much all burst during cooking, which wasn’t good for this salad or my plans to do something other than scrub a pot that evening. But, as you’ve probably already divined from the fact that it’s appearing here, I ultimately triumphed and it was totally worth it.
I am pretty sure that this salad would be fabulous even with canned beans, which is why I’ve tagged it for a weeknight supper; I just had a bee up my bonnet after that first batch rebelled on me. The combination of the brown sugar and the tang of the lemon juice gives a surprising depth of flavor, and the caramelized carrots come out wonderfully sweet. I liked this best warm, but it could be served at room temperature or even cold.
White Bean and Carrot Salad
Adapted from 101 Cookbooks
Olive oil
4 medium carrots
2 shallots
4 c. cooked white beans (or two 15-oz. cans; I used navy beans, but you could use cannellini or their oddly-named smaller cousins, Great Northern beans)
1 T. dried dill or 3 T. fresh dill
3 T. lemon juice
pinch salt
2 T. brown sugar
Wash or peel the carrots, and then slice them as evenly as you can, aiming for slices about a quarter-inch thick. You can do this quickly by trimming the carrots, lining them up side by side, and chopping across all four at once.
Heat a big skillet or chef’s pan over medium heat with a splash of olive oil in it. (Start with 2 T. if you’re the measuring type.) Add the carrots in a single layer. If your skillet isn’t huge or if you’re doubling the recipe, you may need to do this step in batches. Eventually, the carrots will let off a bit of water, and then start to brown. Stir them every few minutes and cook until most of them are nicely caramelized on at least one side, which will be ten or fifteen minutes.
While they’re cooking, peel the shallots and mince them finely. Combine them with 1/4 c. olive oil, the lemon juice, and the salt. Mix with a fork or whisk to combine.
Add the beans and dill to the skillet with another small splash (about a tablespoon) of olive oil. Cook until the mixture is thoroughly heated, about five minutes, then remove from the heat and pour into your serving bowl.
Sprinkle with the brown sugar and add about half of the dressing and stir to mix. Let it sit for five minutes or so, and then taste. You’ll probably want to add most of the rest of the dressing, possibly along with more salt.
Serves six as a main dish and ten as a side; I liked it reheated in the microwave for lunches. If someone in your family is dubious about beans, you could also serve this over couscous or bulgur for a more mixed texture.
This is one of those ideas so good that I wish I’d had it myself: risotto with brie. It is lusciously creamy in a way that the hard cheese we usually use for risotto just can’t match. To stand up to that creaminess, this recipe uses bulgur wheat instead of rice, along with tender roasted asparagus and snappy sun-dried tomatoes.
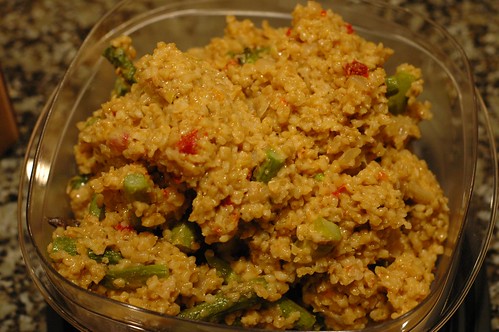
Give this a try even if you don’t especially like the flavor of brie: it’s a relatively small amount and lends more creaminess than flavor. It comes together in about 40 minutes and reheats well in the microwave.
Asparagus Bulgur “Risotto”
Adapted from Serious Eats
4 to 6 c. broth or stock
1 bunch of asparagus (about 1 lb)
1 T. butter
3 T. olive oil
Kosher or sea salt
1 onion
1 1/2 c. bulgur wheat
1/4 c. sun-dried tomatoes*
3-4 oz. brie
Black pepper
Preheat the oven to 400 F.
Snap the bottom of the stems off of the asparagus. Doing this by hand means that it will break where it becomes tender, which is perfect. Throw out or compost the bottoms and chop the tops into roughly two-inch segments.
Put the asparagus on a rimmed baking sheet or in a 9×13 pan, making sure it’s spread in a single layer. Melt the butter and add 1 T. of olive oil. Drizzle over the asparagus and toss to coat, then sprinkle with a generous pinch of salt. Roast for about 15 minutes, stirring once, until the asparagus is tender and starting to brown.
While the asparagus is roasting, mince the onion. Chop the sun-dried tomatoes into tiny pieces — try using kitchen shears if you have them — and set aside. Then remove the rind from the brie and cut it into cubes, and set that aside too.
Heat the rest of the olive oil in a saute or saucepan over medium heat. Add the onion and cook until softened, about five minutes. It’s a little prettier in the end if you don’t let it brown, but it tastes fine either way.
Then add the bulgur and stir to coat the grains with the oil. Cook for a couple of minutes to slightly toast it. Add one cup of the stock or broth. Cook, stirring occasionally, until it is mostly absorbed. Continue adding stock, half to one cup at a time, for about 15 minutes, or until you’ve used four cups of stock.
Then you need to start tasting. When cooked, the bulgur is more tender than al dente pasta; the texture is almost like brown rice. It could take up to half an hour and six cups of stock for it to get there — among other things, bulgur can be ground coarsely or finely, which changes the cooking time. Trust your tounge!
When the bulgur is done, add the asparagus, the sun-dried tomatoes, and the brie. Stir until the brie is largely melted, then remove from the heat. Season with black pepper, then taste and add more salt as desired.
Serves six.
*If you’re not using oil-packed tomatoes here, rehydrate them in boiling water until soft.
My springform pan went on walkabout when I moved last fall. I was in denial about this for a long time, but I finally surrendered and bought a new springform, and therefore, the season of cheesecake has begun! Chocolate cheesecake, to be specific. Actually, chocolate caramel cheesecake. I know.
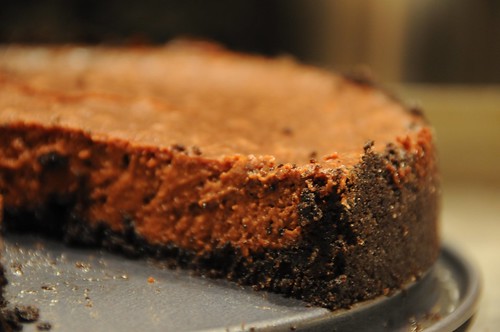
Once you’ve gotten through the caramel-making step (of which it turns out to be utterly impossible to take a picture, because of the need to give not-burning-the-caramel your full attention), this recipe is dead simple. There’s not even a water bath, just chocolate caramel goodness.
By the way, a word about springform pans: they come in two types. Both have a groove where the bottom and the part with the latch connect. In one type, this groove runs around the bottom of the latch part. It’s easier to remove the outside with this type, but trickier to assemble, and, if you’re me, more likely to leak. In the other type, the groove is in the bottom, like so:
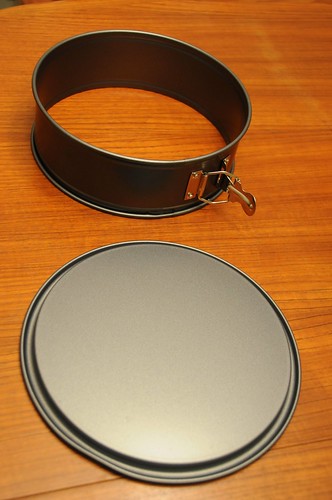
I find these easier to manage, despite the fact that you have to remove the outside by lifting it. For this recipe, a nine- or ten-inch springform should work.
Chocolate Caramel Cheesecake
Adapted from Smitten Kitchen
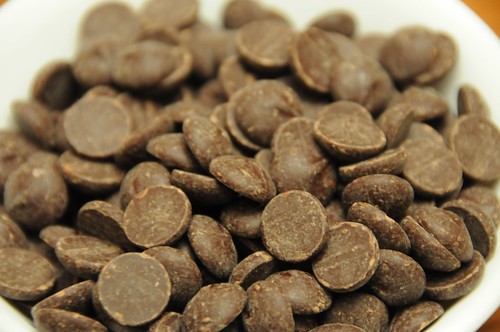
3 c. (~10 oz.) chocolate wafers
10 T. butter
1 2/3 c. sugar
pinch salt
3/4 c. heavy cream
8 oz. bittersweet chocolate (I often use Ghiradelli chips to avoid chopping; if you do too, it’s about 1 1/3 c.)
1/2 c. sour cream
3 c. cream cheese (that’s 3 8-oz. packages)
4 eggs
1 t. vanilla
Crush the cookies. You can do this by whirring them in the food processor, or you can put them in a big plastic bag and beat them up with a rolling pin. Get the crumbs as uniform in size as you can.
Melt the butter in a large, microwave-proof bowl and then add the cookie crumbs, 2/3 c. sugar, and the pinch of salt. Mix to combine.
Assemble your springform and grease it. Then press the cookie crust into the bottom. You can do this by dumping the mixture in the middle and patting it down, then pressing starting in the center out towards the edges until it climbs up them. Aim for a crust as thin as you can manage on the bottom (but without holes!) and sides at least three inches tall. (If you’re thinking “it doesn’t look three inches tall in the photo,” you’re right. That’s because I am a smarty pants and forgot to double the crust recipe and could only use half the filling. We shall not discuss what I did with the other half.) You can leave the crust on the counter or put it in the fridge while you make the filling.
Preheat your oven to 350 F.
Put the remaining cup of sugar into a large heavy-bottomed saucepan. Make sure it’s completely dry when you start! Turn a burner to medium-low and cook the sugar, stirring gently with a silicone spatula, until it melts. Then stop stirring — that part is important — and keep cooking, swirling the pan to mix, until it caramelizes, turning a deep golden brown.
Remove the pan from the heat and add the cream, watching out for the steam and bubbling. The caramel will harden. Then return to the heat and cook until the caramel dissolves to liquid again. Remove from heat and stir in the chocolate with a fork or whisk, mixing until smooth. Then add the sour cream.
In a large bowl, beat the cream cheese (which you should soften first, either by leaving it out or using the microwave) with an electric or stand mixer until it’s fluffy. Turn the mixer to low and beat in the chocolate/caramel/sour cream mixture. Add the eggs one at a time and then the vanilla. Make sure to scrape down the bowl!
If you’re the kind of person who is prone to getting cheesecake all over your oven (read: me), you want to do one of two things at this stage: either put the springform with the crust on a baking sheet or tightly wrap the bottom of the pan, where the two pieces join, in aluminium foil. Then pour the filling in and bake for about 55 minutes. It should be set about halfway from the edges to the center, leaving the center slightly wiggly when you tap the edge of the pan.
Remove from the oven and let cool completely in the pan on the counter, then chill in the fridge for at least a couple of hours — and ideally all day or overnight — before removing the outside of the pan (run a butter knife around the outside of the crust to help) and slicing. Serve chilled or at room temperature as you prefer. Keeps about a week, covered and chilled.
|
|