It’s been a while! Â But look, I made food!
It’s simple and delicious, which is basically the new black around here.
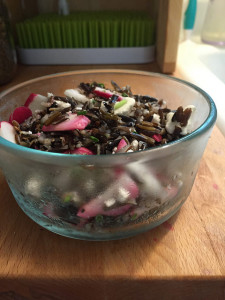
Wild Rice Salad
(Adapted from Bon Appetit)
1 cup wild rice
1 cup radishes
1/4 c toasted unsalted pecans (or another nut)
3 T fresh chives
2 oz feta
1/4 c olive oil
2 T sherry vinegar
Salt and pepper
Make the rice: combine rice, 2 cups of water, and a pinch of salt in a saucepan. Bring to a boil, then cover, reduce heat, and simmer for 45-50 minutes. The rice will be chewy when cooked, and there may be leftover water. If so, just drain it in a colander.
Meanwhile, slice the radishes thinly (I used a mandoline) and then chop roughly, just so most pieces are smaller than a whole slice. Put these into a large bowl. Chop chives (or snip them with scissors) into the same bowl.
In a small jar or bowl, make dressing by combining the olive oil, vinegar, and some salt and pepper.
When the rice is done, add it to the bowl. If you’re impatient, rinse the rice under cold water to help it cool; otherwise you can just wait, stirring occasionally. Once it’s no longer hot, crumble in the feta, sprinkle on the pecans, and dress. Â Taste and add more salt and pepper if you like.
I owe you a lot of recipes, but for now, here’s something to tide you over: cheesecake-marbled brownies. There are probably even more righteous combinations of dairy + chocolate than this, but for something that only takes one pan and a handful of steps, it’s pretty good.
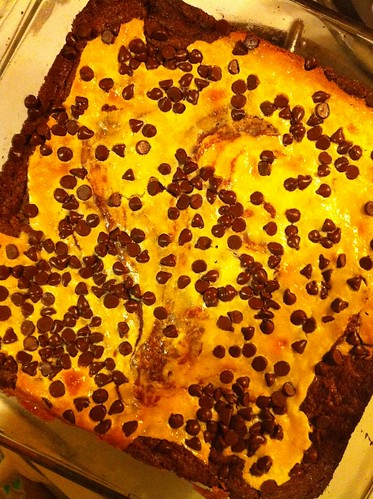
Cheesecake brownies
Adapted from Epicurious via Smitten Kitchen
1 stick butter
3 oz unsweetened chocolate (I use Baker’s brand, but you could go ritzy and use Ghiradelli or something even better!)
2 eggs + 1 yolk
3/4 t. vanilla
2/3 c. flour
1/2 c. chocolate chips
Grease an eight or nine inch square baking pan really well, and preheat the oven to 350.
Melt the stick of butter with the unsweetened chocolate. I like to do this in the microwave in 30-second bursts; if you are (like me) disinclined to chop chocolate, you’ll want to take plenty of time to stir it well between turns in the microwave. When it’s smooth, stir in the sugar, then the two whole eggs and half a teaspoon of the vanilla. Add the flour and mix just until combined. Spread this layer in the baking pan.
Then cream together the cream cheese, the egg yolk, the remaining quarter teaspoon vanilla, and the remaining third of a cup of sugar. If the cream cheese is cold, you’d do well to soften it in the microwave like butter. (I use the defrost setting of my microwave for this.)
Dollop the cheesecake mix over the brownie base, and then swirl it with a knife. (This means to take a butter knife, put the tip all the way down to the bottom of the pan, and then draw it through the batter, creating a swirl. I usually go up and down, then side to side, and sometimes also diagonally for good measure.) Sprinkle the chocolate chips on top.
Bake until a toothpick comes out clean, about 35 minutes. Slice small!
Okay, people. This is getting serious. Even my sister — who doesn’t cook — is asking me why I never post. (The answer is that I am incredibly lame about photos. When I get around to uploading my backlog, there are probably a dozen posts in there.)
But I did actually cook dinner the other night, and it was awesome. This awesome:
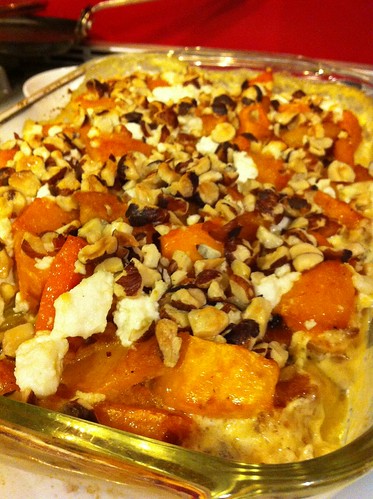
Because you know what could make butternut squash, leeks, and goat cheese better? CREAM. And hey, these days it looks like it might not even kill you. This took me about an hour to get on the table, using squash that was already peeled, which is a little long for a weeknight. I have also since successfully reheated it and the leftovers are quite good.
Butternut squash gratin
Adapted from Epicurious
About 3 lbs or 7-8 c. of peeled, seeded cubed butternut squash*
Olive oil
Salt and pepper
5 T. butter
3 leeks
Sage: 1/2 t. dried or about three times that amount chopped fresh
6 oz. goat cheese
1 c. heavy cream
1/2 c. chopped hazelnuts**
Preheat the oven to 400 F. Put the squash into a pan with a rim (I used two 9×13″ ones). Drizzle it with olive oil, sprinkle it with salt and pepper, and toss to coat. Then roast it until tender, 35-40 minutes. It’s a good idea to stir it once at about the 20-minute mark, especially if you’re using metal pans.
Meanwhile, cut the roots and the green tops off the leeks. Cut the remaining part (the white and light green bit) in quarters the long way, then slice them relatively thinly. Dump all of the pieces in a bowl of clean water and swish them around. (Leeks have this magical capacity to grow with dirt inside them. No lie.)
Melt about 3 T. of butter in a skillet, then scoop the leeks out of the water and add them. (The dirt and grit will settle to the bottom of the bowl, so skimming the leeks off the top works a lot better than upending the bowl over a colander, thereby pouring the dirt back on top.) Add the sage and cook until the leeks are tender and just starting to brown. I found that I needed to add an additional tablespoon of butter during this process to keep them from sticking.
Take the squash out and turn the oven down to 375 F.
The original recipe calls for the gratin to be baked in an 11×7″ dish. I happen to have one of these, so I used it and it worked fine. If you don’t, a square pan (ideally 9×9, but it’s not a precision art) will work too.
Melt the last tablespoon of butter and spread it on the bottom and sides of the pan. Put half of the leeks on top of that, then half the squash. Crumble half the goat cheese on top, then repeat: more leeks, more squash, more cheese. Pour the cream over the whole thing, and sprinkle the hazelnuts on top.
Bake for about 30 minutes, until the cream is bubbly and the cheese is melty. Serve hot.
*So you can totally peel a squash yourself, but you want to make sure to get off not just the skin, but also the light orange, green-veined membrane under the skin, which doesn’t soften when cooked the way the flesh does. You can buy it already in cubes at the store (no one will know!), or, if you’re me, you can still be working through your winter farm share.
**I found chopped hazelnuts ready to go in the baking aisle of my grocery store.
Remember that galette with the amazing crust? Yeah, me too. But since I’m enjoying the way that it is not yet butternut squash season, I wanted a summer version for a dinner recently. Fortunately, I didn’t have to look far.

(Look, kids! Terrible lighting make your zucchini look like sources of nuclear power!)
The part of this that is complicated is that you really need to make and then chill the dough. The good part is that you can do this a day ahead if needed and keep the dough in the fridge, tightly wrapped. The rest is dead easy.
I’ve doubled the recipe from the original below, because a single tart feeds three to four, and it’s so tasty you’re bound to crave leftovers for lunch the next day.
Zucchini and ricotta galette
Adapted from Smitten Kitchen
For the crust:
2 1/2 c. all-purpose flour
Pinch of salt
2 sticks of butter, cold from the fridge (unsalted if you have it)
1/2 c. sour cream
1 T + 1 t. lemon juice
1/2 c. cold water
For the filling:
2 regular or 4 little zucchini
3 T. olive oil
2 cloves of garlic
1 c. whole milk ricotta
1 c. grated parmesan or asiago
1/2 c. grated mozzarella
salt and pepper
Mix the flour and salt, and then cut in the butter. Starting with a pastry blender is the easiest option; if you don’t have one, try cutting the butter into little chunks with a knife and then rubbing it in with your hands. In the end, the mix should have the texture of damp sand.
Stir in the wet ingredients — sour cream, lemon juice, water — and mix just until the dough forms large clumps. Pat these into two roughly-evenly-sized balls, wrap each tightly in plastic wrap, and refrigerate for an hour.
Slice the zucchini into thin (roughly quarter-inch) rounds. Evenness is more important than thickness. Lay the zucchini out on a double layer of paper towels and sprinkle with 1 t. salt. Let them drain for at least 30 minutes.
For the filling, mince or press the garlic and mix it with the olive oil.
In a separate bowl, mix the three cheeses, then add a teaspoon of the garlicky olive oil and salt and pepper to taste.
Blot the zucchini with fresh paper towels to dry it further.
When the dough is chilled, remove it from the fridge and roll each ball out out between two sheets of parchment paper. Aim for a 12-inch round with each. Preheat the oven to 400 F.
Remove the top piece of parchment from each crust and place the bottom piece, with the crust on top of it, on a baking sheet. Spread half of the ricotta mixture on each crust, starting from the center and leaving a 1-inch border. Arrange the zucchini in rings of overlapping slices (like fallen dominoes) on top of the ricotta mix. Drizzle both tarts with the remaining garlicky olive oil. Fold in the edge of the tarts, moving from your starting point in one direction, making pleats as you go to make it work. It will only cover the edge of the filling, which is fine. (Visual aid here.)
Bake for 35-40 minutes, until the crust is golden brown and the zucchini is cooked through. (You can check the latter with a toothpick.) If your oven doesn’t heat evenly, rotate them between racks halfway through. I like this best hot, but if you’re into room-temperature foods, I bet it would be good that way too!
People, this cake. First, it is completely and totally ridiculous. It has two frostings — two — and one of them is a Swiss buttercream, of all things. It asks you to brown butter and then refrigerate it so you can cream it later. You have to make your own damn caramel. It will take every bowl in your kitchen. But it is so totally worth it.
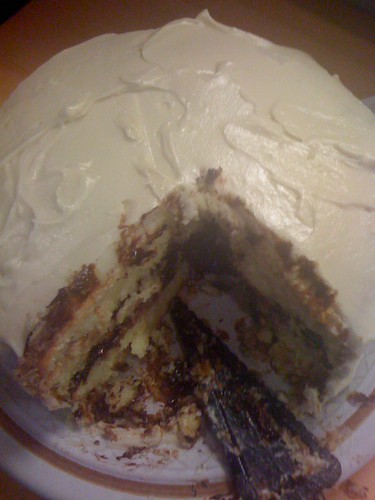
(Q: Why, Sarah, have we been downgraded to terrible cell phone photos? A: Because my camera had a weird error and it took me two weeks to figure out how to fix it. Better photos are returning to us soon.)
You could definitely make the cakes a day ahead and store them wrapped in plastic, but keeping the frostings at a spreadable temperature is a bit tricky as is — I made this on a hot day and needed to chill them in the fridge — so I wouldn’t recommend making them before the day you plan to frost the cake.
Brown Butter Cake with Chocolate and Caramel Frostings
Adapted from Kate Zuckerman’s The Sweet Life: Desserts from Chantrelle via Dessert First
Brown Butter Cake
1 1/2 c. unsalted butter (that’s three sticks or 12 oz.)
1 2/3 c. sugar
2 eggs plus 4 egg yolks (save the whites for the frosting)
2 1/2 c. plus 2 T. flour
3 t. baking powder
Pinch salt
1 1/4 c. milk (I used whole)
Put the butter in a saucepan and place it over a burner turned to medium-high. Once the butter is melted, frequently (and carefully!) swirl the pan or stir it with a silicone spatula. It will foam and then boil, and then, after a few minutes, start to turn brown. You want to smell nutty and have a lovely deep golden-brown color. Watch it carefully so it doesn’t burn.
Once the butter is brown, remove the pan from the heat and pour the butter into a heatproof container. (I used a Pyrex bowl. You could also use a baking pan, but not a nonstick one: the boiling butter could damage the coating.) Stick it in the fridge and leave it there for an hour or so, until it resolidifies. During this process the yellow dairy solids will float to the top and the browned bits will sink to the bottom. Do not worry.
Preheat the oven to 350 F and butter and flour two nine-inch round cake pans.
Using a stand or handheld mixer, beat the browned butter until it becomes creamy. Add the sugar and beat for a minute or two until the mixture becomes fluffy.
Add the eggs one at a time, then the yolks two at a time, beating between each addition.
Combine the dry ingredients — flour, baking powder, and salt — in a medium bowl. Add a third of the mix to the butter mixture and stir to combine, then add half of the milk and mix again. Repeat, stirring between each addition, and then add the final third of the flour mixture. If you use the mixer for this, make sure it’s on the lowest setting. Either way, mix just until incorporated.
Divide the batter between the two prepared pans and bake until a toothpick comes out clean, 35-40 minutes.
Let the cakes cool on racks for about half an hour before running a butter knife around the edge and inverting the pans to remove the cakes.
Chocolate Ganache Filling
6 oz. semisweet chocolate
6 T. heavy cream
Break or chop the semisweet chocolate into small pieces. (I recommend using the bar stuff rather than chips, as it sometimes has more fat and thus a smoother feel on the tongue.)
You need to melt the chocolate and cream together gently. The easiest way to do this is in a Pyrex measuring cup in the microwave: start with 30 seconds, then do 15-second increments, stirring between each. Stop when the chocolate is mostly melted and just stir until it fully melts.
The other way to do it is in a double boiler or a metal bowl set over a pan with a couple of inches of simmering water, stirring constantly until it is smooth.
However you choose to do this, you need to then cool the ganache to room temperature or, if it is summer, a little below.
Caramel Buttercream Frosting
1 3/4 c. sugar
1/2 c. heavy cream at room temperature
4 egg whites (the ones you saved earlier, yes?)
1 1/2 c. unsalted butter at room temperature (that’s still 3 sticks and 3/4 lbs.)
Put one cup of sugar into a saucepan. (Cleanup will be easier if it’s a non-stick pan, but it will be easier to tell how it’s caramelizing if you use a shiny silver pan. Your call.) Add enough water to thoroughly dampen it, so it has a texture like wet sand.
Put the saucepan on a burner over medium heat and swirl until the sugar dissolves. Turn the heat up to medium high and keep watching and swirling every few seconds. (Do not stir, as it can let the sugar crystallize, which is bad.) It will bubble and appear to do nothing until you are thoroughly bored. It is trying to lure you to look away so it can burn; do not fall for it. Eventually, it will start to turn golden and then will move very quickly to being a lovely deep caramel color. Take the pan off the heat.
Now you can stir: whisking constantly, pour the cream into the caramel. It will bubble and steam; watch out for steam burns. Set the caramel aside. Resist the urge to taste it unless you like having a burned tongue.
Now, in the top of a double boiler, or a metal bowl set over a few inches of simmering water, combine the egg whites and the remaining 3/4 cup sugar. Whisk them together until the sugar dissolves. (The only reliable way to figure this out that I’ve found is to rub the mix between your index finger and thumb and see if you can feel the grains of sugar.)
You have two choices here. One is that you can take the egg-sugar mix off the heat once the sugar is dissolved. The other is that you can continue heating the mix to 160 degrees on a thermometer, which might not be the worst idea, given all of the salmonella hullabaloo recently.
When you take the egg mix off the heat, put it in a heatproof bowl (if it isn’t already) and mix it on medium. If you heated to 160, you’ll need to beat it for about five minutes to let it cool down so the frosting doesn’t break; you should be able to touch it comfortably. If you didn’t, you can just beat it until it doubles in volume, roughly. It won’t get huge like egg whites alone, but will incorporate some air.
Add the butter half a stick at a time, beating each time until it is incorporated. At this stage, it may well look like a curdled mess. Keep the faith. You will want to beat it for at least five and maybe ten minutes after all the butter is added, and in this time, it will come back together and get very thick and smooth.
After this happens, pour in the caramel (which should still be thickly pourable; if not, warm it slightly on the stove) and beat to combine. If you’re planning to cool the frosting or otherwise keep it before using, cover the surface with plastic wrap so it doesn’t dry out.
Assemble the cake by putting one cake layer on a plate or platter and spreading the ganache over the top. Top this with the second cake layer, and frost the sides and top with the buttercream. If it’s meltingly hot, refrigerate to keep the frosting set.
Yes, for real. Succotash is a real food, and I have made it, along with some expert assistance from Leah. Furthermore, it is both tasty and wildly in season right now.
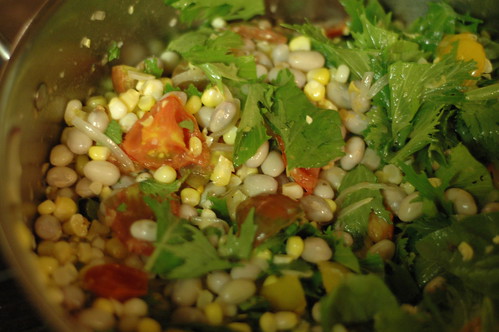
There is nothing hard about this recipe, and you can do almost all of it during the time that the beans are cooking, early on. I ate it both fresh and reheated, and while I liked the crunch of the greens when it was just made, it was also more than sufficiently tasty reheated.
You could probably sub dried beans for the fresh if you can’t find them, but make sure to account for the extra cooking time. (Folks without a local source for great beans could try the famous Rancho Gordo; in my area you can get the local Baer’s Best brand.)

Succotash
Adapted from Smitten Kitchen
1 lb. shell beans (weigh before shelling)
2 T. olive oil
1 onion (sweet if you have it)
2 cloves of garlic
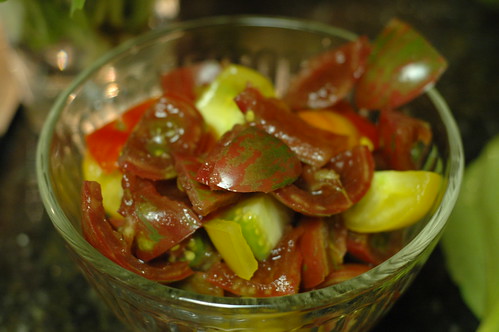
2 pints cherry tomatoes
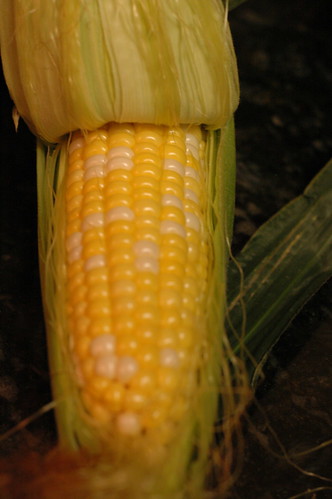
4 ears of corn
1 T. sherry or cider vinegar, plus extra to taste
1/4 c. fresh basil (or a tablespoon or so dried)
1/2 c. arugula
Bring a saucepan of salted water to a boil, and shell the beans. Add the beans to the water when it boils and cook until tender, about 20 minutes. Drain the beans.
Meanwhile, peel and dice the onion. Peel the garlic and mince it or put it through a press. Halve the cherry tomatoes, squeezing out the seeds if you like. Cut the kernels off of the ears of corn. Here is the best trick ever for that, ably demonstrated by Leah:
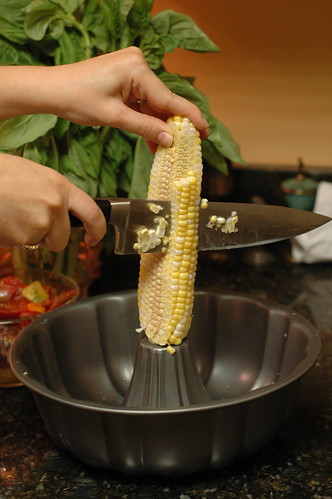
(That’s the center of a bundt pan that the corn is stuck into, and the kernels fall right into it when you slice them off. I learned this from the internet last year and it has improved my life immensely.)
Heat the oil in a large chef pan or saucepan. (You’ll end up with the whole dish in this pan eventually.) Add the onion and garlic and cook over medium heat until the onion softens. Then add the tomatoes, corn kernels, and vinegar and cook for a few minutes, just until the tomatoes begin to soften and lose their shape.
Remove the pan from the heat and stir in the cooked beans. Tear the arugula into bite-size pieces and the basil into smaller pieces and mix them in. Add salt and pepper and season to taste with more vinegar. Serve warm or at room temperature.
Serves four as a main course, six as part of a meal.
The single most appealing time of day for me to bake is right before bedtime. I’m a morning person, so evening is not a time for complex tasks; it’s more like time for cookies or quickbreads. And then when you wake up, your kitchen smells heavenly. What’s not to like?

Cupcakes are also one of those foods I mostly crave at 10 pm. The problem with this is that at 10 pm, cupcakes are within the realm of reason, but frosting is not. For years, I solved this problem by baking cupcakes from mixes late at night and eating them with frosting from a can. (I know, I know.) But now, a solution has come to me: self-frosting cupcakes. Genius, no?
These are a lightly sweet, vanilla batter with Nutella swirled around the top in lieu of frosting. It’s not quite the same experience as licking frosting off the top, but it’s a totally reasonable 10 pm substitute!
Nutella self-frosting cupcakes
Adapted from Baking Bites
10 T. butter (that’s one and a quarter sticks)
3/4 c. white sugar
3 eggs
1 t. vanilla
1 3/4 c. flour
pinch salt
2 t. baking powder
12 heaping teaspoons of Nutella
Preheat the oven to 325 F.
Soften the butter, either by leaving it on the counter overnight or in the microwave. Cream the butter and sugar together; if you’re using a mixer, give it a few minutes to get light and fluffy, but I don’t recommend worrying about it if you’re mixing by hand.
Add the eggs and vanilla and mix. At this point, the batter will look curdled. Do not fear. Add the dry ingredients all at once: flour, salt, and baking powder.* Mix to combine.
Divide the batter evenly between twelve lined or greased muffin cups. They should be about three-quarters full.
Now you need to get a heaping teaspoon of Nutella on top of each cupcake. I tried this a lot of ways, and eventually decided that the best way was to measure for the first one and then eyeball the rest using either a regular spoon or my fingers, both of which are much easier to get Nutella off of than the teaspoon.
Use a toothpick to swirl the Nutella into the batter, pulling a bit of batter up over the topping. Bake for about 20 minutes, until a toothpick comes out with only Nutella. Be careful not to overbake.
I strongly recommend allowing them to cool before eating, as Nutella has an amazing capacity to stay very hot long past the point of reason. We shall not discuss how I learned this.
*I mostly don’t believe in mixing dry ingredients separately except in the most delicate of operations, but you can help things go more smoothly by putting the flour directly on top of the wet ingredients, and the leavening on top of that. That way, the baking powder can’t get slightly wet and clump all together, leaving you with 11 unrisen cupcakes. Instead, it gets tumbled around with the flour.
I am about to break the food blogger’s code of honor by admitting this, but I bet I’m not the only one: I have been wildly uninspired in the kitchen lately. Even in the midst of the greatest produce season of the year, my farmshare has been inspiring more blank stares than delighted squeals. (This is not, I hasten to add, in any way the fault of the amazing farmers in question. The produce is beautiful.) The other day, faced with a counter covered in tomatoes, I literally could not think of a single thing I wanted to do with them.
I blame my culinary ennui on several things. One is that — as I’m sure many of you constantly are — I’m short on time to cook, and the cooking I do so that we have something to eat for lunch is among my least inspired. Another is that I’ve been messing endlessly with my diet trying to nail down some pesky food sensitivities, and cooking to a rotating set of restrictions is challenging. I may also be suffering from a surfeit of choice: too many tasty recipes to pick from!
I am recovering my food mojo, and have a recipe post scheduled for tomorrow, but in the meantime, some things I’ve learned about how to get your kitchen groove back:
1. When you’re longing for simple, think elegant. Some of the most amazing food combinations are dead simple. I just read a beautiful article by Paula Wolfert about bread and tomatoes. I love goat cheese with sundried tomatoes. Almost anything can be made excellent with balsamic reduction.
2. Plan ahead. If during a fit of culinary inspiration, you stash a couple of quarts of soup in your freezer, you will be saved by your own hand when the dry season comes.
3. When uninspired, think types of flavors. If I can’t think of what I want to eat, I try thinking bigger: do I want salty or sweet? Crunchy or chewy?
4. Try cooking for others. Most of us, it turns out, get into weird culinary ruts when cooking only for ourselves. I find that this is almost as true if I’m cooking for other people who eat it later or at work or something. Cooking for a hungry audience right in front of me is a different experience that often makes more effort feel worthwhile.
How about you? Do you get into kitchen ruts? What gets you out of them?
I am against mayonnaise. My objection is 95% intellectual (egg sauce? really?), and for inexplicable reasons, does not apply to homemade aioli. I have no justification for this, but it’s true, and therefore most potato salad is just not my kind of thing. But then I learned about French potato salad.
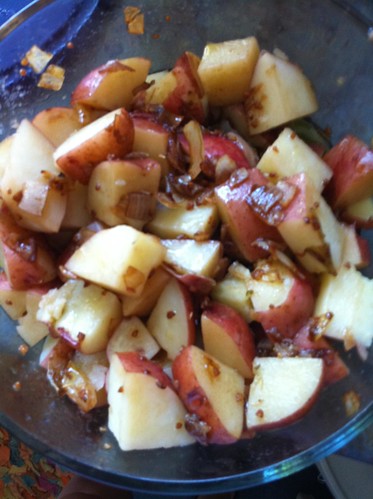
Look, ma, no mayo!
The best part of this salad is the onions and garlic, which caramelize gently in the oil as you make the dressing. Don’t skip the sugar in the dressing; it is that magic ingredient that makes the whole thing more than the sum of its parts. I like the salad best at room temperature, but I’m like that.
A word about potatoes: I’ve made this with several kinds, and all of them taste fine, but waxier varieties (like the red-skinned ones you see in the spring) hold their shape the best.
French potato salad
2 lbs. potatoes
1/4 c. olive oil (I like to be generous with this pour)
2 cloves of garlic (or roughly 2 t. minced garlic or 1 t. garlic paste)
1 small onion
2 T. balsamic vinegar
Pinch dried oregano (or thyme)
pinch sugar
salt to taste
Wash the potatoes and cut them into one- or two-bite pieces. Put the pieces in a pot of cold water with a generous pinch of salt and put the whole thing on a burner over high heat. Bring to a boil, reduce the heat to a simmer, and cook for 10-15 minutes, until the pieces are easily pierced by a fork. Drain in a colander.
Meanwhile, dice the onion and garlic, and heat the olive oil in a skillet. Add the onion and garlic and cook over medium-low heat until they are very soft, five or seven minutes. Then add the balsamic and oregano, remove from the heat, and stir in the sugar and a generous pinch of salt.
Pour the dressing over the potatoes while they’re still hot. (Because the oil in the dressing is very hot, don’t use a plastic bowl for this!) I think this tastes best if you let it sit for a few hours; it will keep in the fridge for a handful of days.
Have I mentioned recently that it’s hot here? Some evenings it gets cool enough that I can think about turning on the stove, but the oven is pretty much out of the question. So it is, once again, salad time.
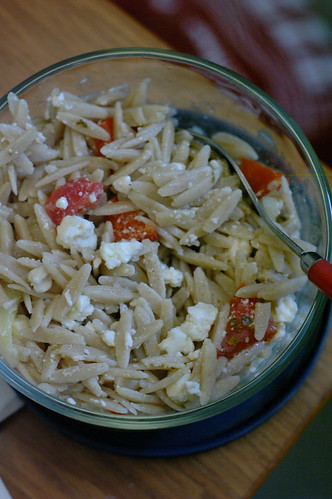
I’m having a bit of a Greek salad obsession (it it just me, or does feta cheese taste like summer?), so I’ve been hunting around for creative variations on the cucumber-tomato-feta theme. This one combines them with orzo (which has the special virtue of cooking in ten minutes) and a light vinaigrette dressing. The quantities of ingredients can definitely be adjusted to taste, and it’s tasty cold or at room temperature. And as tomatoes start to come more and more into their own this summer, this salad is only getting better.
A note about the dressing: this errs significantly on the side of being vinegary. (Traditionally, vinaigrettes have at least twice as much oil as vinegar.) I like it, but taste it before you dress and add more olive oil if the bite is too strong for your taste. Any leftover dressing is, of course, fair game for use on other salads.
Greek Orzo Salad
1 c. uncooked orzo (I used whole wheat, but regular would be fine too)
1 cucumber
1 pint cherry tomatoes or 2 medium tomatoes
3 oz. feta cheese
4 T. white wine vinegar
2 T. olive oil
pinch dried oregano
salt and pepper
First, bring a pot of salted water to boil on the stove. Add the orzo and cook as directed.
Meanwhile, peel the cucumber. Cut it in half the long way and scoop out the seeds if you like. Then slice it thinly into half-moons.
Wash the tomatoes and dice them. I like to squish out most of the seeds, but it’s just a personal preference.
In a small bowl or jar, mix the oil, vinegar, oregano, and salt and pepper to taste. Salt lightly, as the feta in the salad is itself quite salty.
Combine the cucumber and tomato in a bowl. When the orzo is cooked, drain it and rinse briefly under cool water, just to cool it down. Shake the colander around to try to get as much excess water off as you can.
Add the orzo to the bowl, and stir to combine. If the salad is still warm, let it cool in the fridge before crumbling the feta over it. Dress this salad no more than 24 hours before you plan to eat it. Immediately before is ideal here, but I found I could mix a single serving of salad and dressing in the morning and eat it for lunch in the late afternoon without anything getting soggy.
|
|